 Velnode/ Docs / Getting Startedv2.3.3-beta.15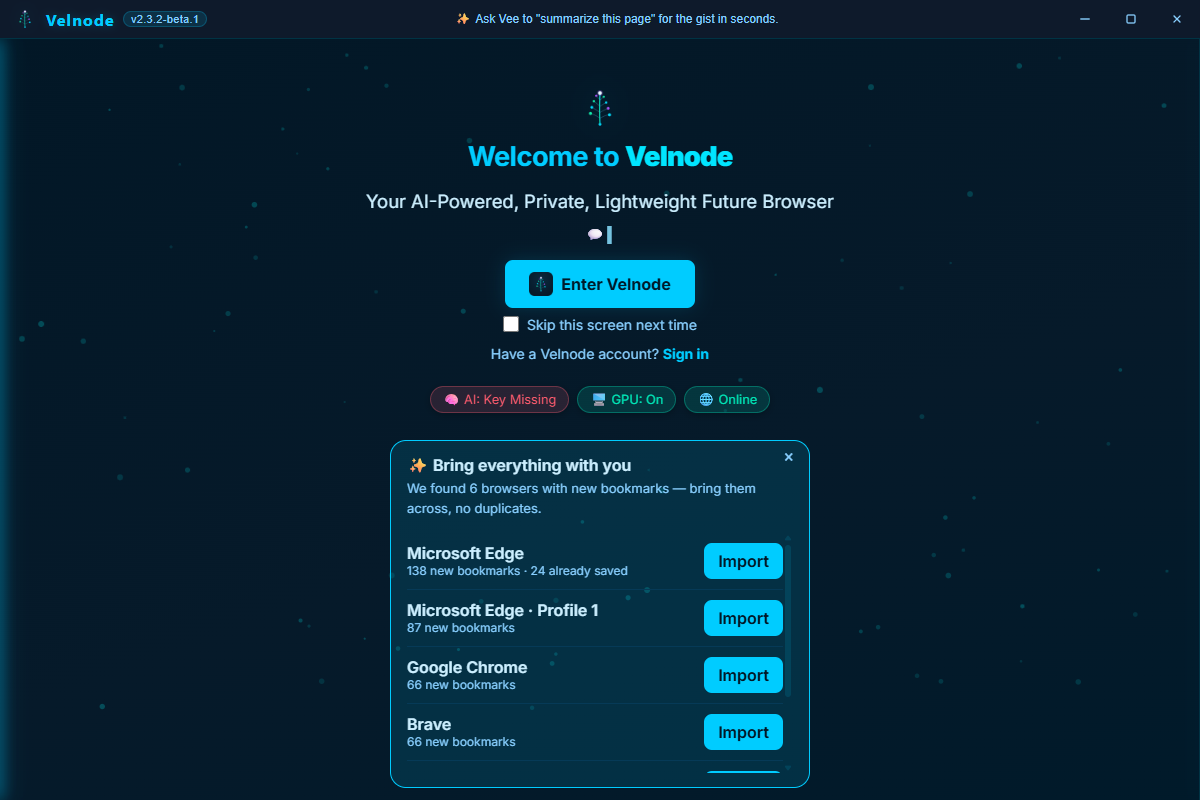
Velnode Browser · a product of Dignity New Zealand Limited
User | Version 1.5 | Last updated 2026-07-03
Document type: User Owner: Dignity New Zealand Limited Applies to: Velnode Browser v2.3 and later Last updated: 2026-07-03 Document version: 1.5 Status: Approved
Welcome to Velnode Browser, a product of Dignity New Zealand Limited. This guide walks you through the first ten minutes — install, first launch, meeting Vee, bringing your bookmarks across, and the handful of settings worth checking before you settle in.
Public beta. Velnode v2.3.2-beta.1, released 2026-07-03, is the first public beta. It runs on Windows 10 and 11 (64-bit) only — macOS and Linux builds are planned for a later release. Expect rough edges, and please report anything odd to
[email protected].
Velnode-Setup.exe (about 182 MB), served from downloads.velnode.app.You do not need to sign in. Velnode has no required user account. Your data stays on your device.
Want to verify the download before you run it? Velnode publishes SHA-256 checksums for every release at downloads.velnode.app/latest/SHA256SUMS.txt. In PowerShell, run Get-FileHash Velnode-Setup.exe and compare the result against the published checksum.
Reinstalling or updating never touches your data. Your bookmarks, history, notes, and vault live in your profile folder, separate from the installer — running the installer again over an existing install updates the app in place and keeps everything you have saved.
Take thirty seconds to notice three things:
example.com to navigate. Type a question to ask Vee. Type note: remember to call Sara to drop a sticky note on the current tab.In the Command + Context bar, type:
What can you do?
Vee will introduce itself and offer a few suggestions. From here on, you can talk to Vee in ordinary English. A few things worth trying:
Summarise this page. — summarises the page in the active tab.Find: bookmark on macroeconomics. — searches your timeline semantically.Pin "morning brief". — pins a Vee command for one-click reuse later.Vee is built on a policy layer. It will decline certain requests — see Vee Capabilities §2. These are by design, not bugs.
If you are switching from Chrome, Edge, Brave, Opera, or Vivaldi, Velnode can bring your bookmarks and browsing history across automatically — no export file needed.
Velnode reads only the data types you choose to import — bookmarks or browsing history — from the other browser on your device. Passwords, cookies, and other browser data are not accessed, and nothing is transmitted.
You can also start this flow from the welcome screen — if Velnode detects another browser the first time you launch, a "Bring everything with you" prompt appears at the top of the welcome page. One tap brings across the bookmarks from your default profile.
The same import option is available inside the bookmarks manager (velora://bookmarks) via the "From browser" button.
If you prefer the traditional route:
velora://bookmarks.http:// and https:// links are imported; other schemes are skipped.To export your bookmarks from Velnode for use elsewhere, choose ☰ → Bookmarks → Export.
If you have saved passwords in Chrome, Edge, Brave, Opera, Vivaldi, or Firefox, you can import them into the Velnode vault.
Privacy note: Velnode reads only the CSV file you export yourself, using your source browser's own OS authentication. Velnode never reads or decrypts another browser's password database directly. Your imported passwords are stored in the Velnode vault on your device and are never transmitted.
To bookmark the page in the active tab, click the ★ in the address bar or press Ctrl+D (Cmd+D on macOS). A small popover opens where you can edit the name and choose a folder, then click Done.
To see all your bookmarks, open the Favorites flyout (📘 toolbar button, or Ctrl+Shift+O). From there you can search, create folders, drag bookmarks between folders, and click Open full manager to go to velora://bookmarks — a two-pane view with the full folder tree on the left and bookmark cards on the right.
To show the Favorites bar under the toolbar, open the ☰ menu → Bookmarks → Show favorites bar. It is off by default. Folders on the bar open as dropdowns and you can drag items to reorder them.
Your bookmarks are stored on your device. Velnode never sends them to a server.
A Velnode Account lets you sign in on multiple devices. It is entirely optional — everything you have done so far works with or without one.
To create an account:
Open velora://account in the address bar, or go to Settings → Account → Create account.
Enter your email address and choose a password. The password must be at least 12 characters and reasonably complex — Velnode will tell you if it is not strong enough.
Velnode runs a short key-derivation step ("Securing your account…"). This takes a few seconds — it is working hard to protect your keys.
Save your Recovery Kit. After sign-up, Velnode shows you a 24-word Recovery Kit phrase and offers to download it as a PDF Emergency Kit. This phrase is shown once. Write it down or print the PDF and store it somewhere safe.
Why it matters. If you forget your password, a reset link restores your login — but it cannot unwrap your previously encrypted data. Your Recovery Kit is the only way to get that data back. If you lose both your password and your Recovery Kit, previously-synced encrypted data is unrecoverable. This is the unavoidable consequence of true end-to-end encryption.
Click I've saved my Recovery Kit — continue. Velnode takes you to the Account page showing your email address and plan.
Sign in on another device. Open velora://account, choose Sign in, enter your email and password. Velnode re-derives your key from the password automatically — no extra codes are required.
The vault is separate. Signing in does not unlock your Password Vault. The vault opens only with its own master passphrase, exactly as before.
Open Settings (gear icon, or Ctrl/Cmd + ,). Walk through these five sections:
Turn Local-Only mode on if you do not want Vee to send any prompts to a cloud provider. With Local-Only on, Vee uses only the local LLM brain — downloadable from Settings → AI → Add local Vee brain. Until you download it, Vee will respond from its built-in knowledge only.
A Vee Brain wants about 4 GB of free memory while answering, and the first answer after launch takes a minute or two while it reads your context (a one-time cost — later answers start in seconds). If an answer won't start, close some heavy apps and ask again.
If a child uses this device, turn Kids Mode on and set a parental code. Kids Mode forces Local-Only, restricts navigation to an allow-list, and locks the toggle behind the code.
If you want Vee to use a cloud model, enter your API key here. The key is stored by the main process — the renderer never sees it. You can delete it at any time from Settings.
If you want to use Vee Whisper (voice input), choose the keyboard shortcut that summons it. The always-listening wake-word ("Hey Vee") is a separate opt-in download and is not bundled with the installer.
This button clears your Smart Timeline and rebuilds empty semantic memory. Use it if you ever want a clean start.
note: on a tab you will come back to. Notes are searchable.find: rather than digging through history manually.If Velnode fails to start or Vee fails to respond, see Troubleshooting. If you have found a security issue, see the disclosure path in the Acceptable Use Policy §5.
Document maintained by Dignity New Zealand Limited. Questions: [email protected].